#docker port forwarding running container
Explore tagged Tumblr posts
Visit Tumblr Blog
Explore Tumblr blogs with no restrictions, modern design and the best experience.
Last Seen Tumblr Blogs


Fun Fact
After the announcement of the deal with Yahoo!, there were 170K signatures of unhappy Tumblr users petitioning to prevent the sale in 2013.
Link
#autoSSL#Automation#cloud#configuration#containerization#DevOps#Docker#HTTPS#Let'sEncrypt#Linux#networking#NGINX#proxyserver#reverseproxy#Security#self-hosted#servermanagement#systemadministration#TLS#Traefik#webserver
0 notes
Text
Deploying Text Generation Web UI on a Kubernetes Cluster
In this blog post, we'll walk through the process of deploying a text generation web UI using the Docker image atinoda/text-generation-webui on a Kubernetes cluster. We'll cover everything from creating a Persistent Volume Claim (PVC) to setting up a Kubernetes Service for port forwarding.
Prerequisites
A running Kubernetes cluster
kubectl installed and configured to interact with your cluster
Step 1: Create a Namespace
First, let's create a namespace called text-gen-demo to isolate our resources.
kubectl create namespace text-gen-demo
Step 2: Create a Persistent Volume Claim (PVC)
We'll need a PVC to store our data. Create a YAML file named text-gen-demo-pvc.yaml with the following content:
apiVersion: v1 kind: PersistentVolumeClaim metadata: name: text-gen-demo-pvc namespace: text-gen-demo spec: accessModes: - ReadWriteOnce resources: requests: storage: 100Gi storageClassName: standard
Apply the PVC:
kubectl apply -f text-gen-demo-pvc.yaml
Step 3: Deploy the Pod
Create a YAML file named text-gen-demo-pod.yaml with the following content:
apiVersion: v1 kind: Pod metadata: name: text-gen-demo-pod namespace: text-gen-demo labels: app: text-gen-demo spec: containers: - name: text-gen-demo-container image: atinoda/text-generation-webui ports: - containerPort: 7860 - containerPort: 5000 - containerPort: 5005 env: - name: TORCH_CUDA_ARCH_LIST value: "7.5" volumeMounts: - name: text-gen-demo-pvc mountPath: /app/loras subPath: loras - name: text-gen-demo-pvc mountPath: /app/models subPath: models volumes: - name: text-gen-demo-pvc persistentVolumeClaim: claimName: text-gen-demo-pvc
Apply the Pod:
kubectl apply -f text-gen-demo-pod.yaml
Step 4: Create a Service
Create a YAML file named text-gen-demo-service.yaml with the following content:
apiVersion: v1 kind: Service metadata: name: text-gen-demo-service namespace: text-gen-demo spec: selector: app: text-gen-demo ports: - name: "webui" protocol: TCP port: 7860 targetPort: 7860 - name: "api" protocol: TCP port: 5000 targetPort: 5000 - name: "api-stream" protocol: TCP port: 5005 targetPort: 5005
Apply the Service:
kubectl apply -f text-gen-demo-service.yaml
Step 5: Port Forwarding
Finally, let's set up port forwarding to access the web UI locally.
kubectl port-forward svc/text-gen-demo-service 7860:7860 -n text-gen-demo
You should now be able to access the web UI at http://localhost:7860.
Troubleshooting
If you encounter issues with port forwarding, make sure:
The pod is running and healthy (kubectl get pods -n text-gen-demo)
The service is correctly configured (kubectl describe svc text-gen-demo-service -n text-gen-demo)
The service has endpoints (kubectl get endpoints text-gen-demo-service -n text-gen-demo)
Conclusion
You've successfully deployed a text generation web UI on a Kubernetes cluster! You can now interact with the web UI locally and generate text as needed.
0 notes
Text
Docker Container Port Mapping Tutorial for beginners | Docker Port Expose and Port Forwarding
Full Video Link: https://youtu.be/2gie3gpDJUg Hi, a new #video on #dockerportmapping is published on @codeonedigest #youtube channel. Learn docker container port forwarding and docker expose. What is docker port mapping and -p option. Running docker cont
Docker container port mapping and port forwarding. Docker expose attribute in Docker file is used to forward container port to the host machine. Running docker container on custom port. Using docker expose, run the docker application on specific port. How to run docker image on specific port? What is port mapping in docker container? Why docker port mapping is not working? Why containerized…

View On WordPress
#docker#docker and Kubernetes#docker compose#docker compose port mapping#docker container port change#docker container port forwarding not working#docker container port mapping#docker container port mapping explained#docker container port not exposed#docker container ports explained#docker port forwarding#docker port forwarding doesn’t work#docker port forwarding existing container#docker port forwarding running container#docker port mapping#docker port mapping explained#docker port mapping not working#docker port mapping tutorial#docker port mapping vs expose#docker tutorial#docker tutorial for beginners#port mapping in running docker container#run docker container on custom port#update docker container portainer#what is docker
0 notes
Text
AEM Dispatcher
What is AEM Dispatcher?
Get In Touch
AEM Dispatcher is a web server module (provided by Adobe) that sits in front of an AEM instance and caches and delivers content to users. It acts as a proxy server that intercepts requests to AEM and serves cached content whenever possible. AEM Dispatcher can be used to cache both static and dynamic content, and it uses a set of rules and configurations to determine when to serve cached content and when to forward requests to AEM.
Key benefits of using AEM Dispatcher:
Improved performance: AEM Dispatcher reduces the load on the AEM instance by caching and serving content from the cache.
Reduced server load: By serving content from the cache, AEM Dispatcher reduces the load on the AEM server, allowing it to handle more requests and users.
Better security: AEM Dispatcher can be configured to provide an additional layer of security for AEM by blocking harmful requests and limiting access to certain resources.
Scalability: AEM Dispatcher can be used to distribute content across multiple servers, making it easier to scale AEM for large-scale deployments.
How AEM Dispatcher works:
AEM Dispatcher works by intercepting requests to AEM and checking whether the requested content is in the cache. If the content is in the cache, AEM Dispatcher serves it directly to the user.
If the content is not in the cache, AEM Dispatcher forwards the request to AEM, which generates the content and sends it back to AEM Dispatcher.
AEM Dispatcher then caches the content and serves it to the user. AEM Dispatcher uses a set of rules and configurations to determine when to serve cached content and when to forward requests to AEM.
Dispatcher setup for AEM as a cloud service in linux/mac using docker
Prerequisites for Dispatcher Setup
Apache 2.2 web server
Dispatcher Module
Docker setup in local
Installation Instructions
Install Apache web server
Run this command to install the apache package on ubuntu
sudo apt install apache2 -y
Install Docker
Run this command to install the latest docker package on ubuntu
sudo apt-get install docker-ce docker-ce-cli containerd.io docker-buildx-plugin docker-compose-plugin
For Verify docker was installed correctly, Run this comman
docker --version
Execute
aem-sdk-dispatcher-tools-<version>-unix.sh
Run this command to execute script
chmod +x <fileName>
sudo ./<fileName>
Validate the Dispatcher configuration contained in this SDK
$ sudo ./bin/validator full -d out src
This validates the configuration and generates deployment information in out
Validate the deployment information by the Dispatcher in a docker image
$ sudo ./bin/docker_run.sh out localhost:4503 test
This will start the container, run Apache in configuration test mode (httpd -t), dump processed dispatcher. any config (-D DUMP_ANY) and exit.
Confirm that no immutable config file was changed against a docker image ones
$ sudo ./bin/docker_immutability_check.sh src
With your AEM publish server running on your computer, listening on port 4503, you can start the dispatcher in front of that server as follows:
$ sudo ./bin/docker_run.sh out host.docker.internal:4503 8888
Sometimes, You may encounter this error “Waiting until host.docker.internal is available”, to resolve this use your host ip
bin/docker_run.sh src <HOST IP>:4503 8888
Read more!!
0 notes
Text
YaCy's Docker image behind Nginx as reverse proxy

YaCy is a peer-to-peer search engine. Every peer sets up his own client and is able to crawl and index websites. Searches are carried out by contacting all known peers and cumulating their returns. It is not necessary to have a web server for that. You may well install YaCy on your office computer but of course it only works as long as it is connected to the internet. A long time ago I maintained a YaCy peer on my web server. Later I lost interest because there were (and still are) too less peers online to be a reasonable alternative to Google. Usually only a few hundred concurrently. But to flatter my vanity I now decided to set up my own peer again mainly to introduce several websites I am part of the admin team. Main issue now was that my webserver employs Nginx as reverse proxy and I do not want to expose additional ports to the internet (YaCy's default ports are 8090 and 8443). Good luck, due to the Docker image the install procedure proved fairly easy! Both Nginx and YaCy need the default settings only! In order to use Nginx as reverse proxy its configuration needs to contain some special commands. My default proxy_params file is longer than its pendant in the Nginx GitHub repository: proxy_set_header Host $http_host; proxy_set_header X-Real-IP $remote_addr; proxy_set_header X-Forwarded-For $proxy_add_x_forwarded_for; proxy_set_header X-Forwarded-Proto $scheme; client_max_body_size 100M; client_body_buffer_size 1m; proxy_intercept_errors on; proxy_buffering on; proxy_buffer_size 128k; proxy_buffers 256 16k; proxy_busy_buffers_size 256k; proxy_temp_file_write_size 256k; proxy_max_temp_file_size 0; proxy_read_timeout 300; This proved good enough. Installing YaCy from Docker requires only two comands (head over to this particular site to learn how to backup and update your instance): docker pull yacy/yacy_search_server:latest docker run -d --name yacy_search_server -p 8090:8090 -p 8443:8443 -v yacy_search_server_data:/opt/yacy_search_server/DATA --restart unless-stopped --log-opt max-size=200m --log-opt max-file=2 -e YACY_NETWORK_UNIT_AGENT=mypeername yacy/yacy_search_server:latest We do not need settings for TLS in YaCy since this is done bx Nginx (employing Let's Encrypt in this case). Since YaCy's internal links are all relative, we can proxy the localhost without caring for host name and protocol schemen. The following Nginx server is fully operational: server { listen 443 ssl http2; listen [::]:443 ssl http2; server_name my.host.name; root /var/www/my.host.name; index index.html index.htm default.html default.htm; location / { proxy_pass http://127.0.0.1:8090; include /etc/nginx/proxy_params; } access_log /var/log/nginx/my.host.name_access.log; error_log /var/log/nginx/my.host.name_error.log; ssl_certificate /etc/letsencrypt/live/my.host.name/fullchain.pem; # managed by Certbot ssl_certificate_key /etc/letsencrypt/live/my.host.name/privkey.pem; # managed by Certbot } Head over to my search interface. But attention: there is an extended blacklist excluding pseudo science, extremist politics, conspiracy theories and so on (mainly German sites). Use another YaCy instance to get the same search without my exclusions.

Read the full article
0 notes
Text
The Elastic stack (ELK) is made up of 3 open source components that work together to realize logs collection, analysis, and visualization. The 3 main components are: Elasticsearch – which is the core of the Elastic software. This is a search and analytics engine. Its task in the Elastic stack is to store incoming logs from Logstash and offer the ability to search the logs in real-time Logstash – It is used to collect data, transform logs incoming from multiple sources simultaneously, and sends them to storage. Kibana – This is a graphical tool that offers data visualization. In the Elastic stack, it is used to generate charts and graphs to make sense of the raw data in your database. The Elastic stack can as well be used with Beats. These are lightweight data shippers that allow multiple data sources/indices, and send them to Elasticsearch or Logstash. There are several Beats, each with a distinct role. Filebeat – Its purpose is to forward files and centralize logs usually in either .log or .json format. Metricbeat – It collects metrics from systems and services including CPU, memory usage, and load, as well as other data statistics from network data and process data, before being shipped to either Logstash or Elasticsearch directly. Packetbeat – It supports a collection of network protocols from the application and lower-level protocols, databases, and key-value stores, including HTTP, DNS, Flows, DHCPv4, MySQL, and TLS. It helps identify suspicious network activities. Auditbeat – It is used to collect Linux audit framework data and monitor file integrity, before being shipped to either Logstash or Elasticsearch directly. Heartbeat – It is used for active probing to determine whether services are available. This guide offers a deep illustration of how to run the Elastic stack (ELK) on Docker Containers using Docker Compose. Setup Requirements. For this guide, you need the following. Memory – 1.5 GB and above Docker Engine – version 18.06.0 or newer Docker Compose – version 1.26.0 or newer Install the required packages below: ## On Debian/Ubuntu sudo apt update && sudo apt upgrade sudo apt install curl vim git ## On RHEL/CentOS/RockyLinux 8 sudo yum -y update sudo yum -y install curl vim git ## On Fedora sudo dnf update sudo dnf -y install curl vim git Step 1 – Install Docker and Docker Compose Use the dedicated guide below to install the Docker Engine on your system. How To Install Docker CE on Linux Systems Add your system user to the docker group. sudo usermod -aG docker $USER newgrp docker Start and enable the Docker service. sudo systemctl start docker && sudo systemctl enable docker Now proceed and install Docker Compose with the aid of the below guide: How To Install Docker Compose on Linux Step 2 – Provision the Elastic stack (ELK) Containers. We will begin by cloning the file from Github as below git clone https://github.com/deviantony/docker-elk.git cd docker-elk Open the deployment file for editing: vim docker-compose.yml The Elastic stack deployment file consists of 3 main parts. Elasticsearch – with ports: 9200: Elasticsearch HTTP 9300: Elasticsearch TCP transport Logstash – with ports: 5044: Logstash Beats input 5000: Logstash TCP input 9600: Logstash monitoring API Kibana – with port 5601 In the opened file, you can make the below adjustments: Configure Elasticsearch The configuration file for Elasticsearch is stored in the elasticsearch/config/elasticsearch.yml file. So you can configure the environment by setting the cluster name, network host, and licensing as below elasticsearch: environment: cluster.name: my-cluster xpack.license.self_generated.type: basic To disable paid features, you need to change the xpack.license.self_generated.type setting from trial(the self-generated license gives access only to all the features of an x-pack for 30 days) to basic.
Configure Kibana The configuration file is stored in the kibana/config/kibana.yml file. Here you can specify the environment variables as below. kibana: environment: SERVER_NAME: kibana.example.com JVM tuning Normally, both Elasticsearch and Logstash start with 1/4 of the total host memory allocated to the JVM Heap Size. You can adjust the memory by setting the below options. For Logstash(An example with increased memory to 1GB) logstash: environment: LS_JAVA_OPTS: -Xm1g -Xms1g For Elasticsearch(An example with increased memory to 1GB) elasticsearch: environment: ES_JAVA_OPTS: -Xm1g -Xms1g Configure the Usernames and Passwords. To configure the usernames, passwords, and version, edit the .env file. vim .env Make desired changes for the version, usernames, and passwords. ELASTIC_VERSION= ## Passwords for stack users # # User 'elastic' (built-in) # # Superuser role, full access to cluster management and data indices. # https://www.elastic.co/guide/en/elasticsearch/reference/current/built-in-users.html ELASTIC_PASSWORD='StrongPassw0rd1' # User 'logstash_internal' (custom) # # The user Logstash uses to connect and send data to Elasticsearch. # https://www.elastic.co/guide/en/logstash/current/ls-security.html LOGSTASH_INTERNAL_PASSWORD='StrongPassw0rd1' # User 'kibana_system' (built-in) # # The user Kibana uses to connect and communicate with Elasticsearch. # https://www.elastic.co/guide/en/elasticsearch/reference/current/built-in-users.html KIBANA_SYSTEM_PASSWORD='StrongPassw0rd1' Source environment: source .env Step 3 – Configure Persistent Volumes. For the Elastic stack to persist data, we need to map the volumes correctly. In the YAML file, we have several volumes to be mapped. In this guide, I will configure a secondary disk attached to my device. Identify the disk. $ lsblk NAME MAJ:MIN RM SIZE RO TYPE MOUNTPOINT sda 8:0 0 40G 0 disk ├─sda1 8:1 0 1G 0 part /boot └─sda2 8:2 0 39G 0 part ├─rl-root 253:0 0 35G 0 lvm / └─rl-swap 253:1 0 4G 0 lvm [SWAP] sdb 8:16 0 10G 0 disk └─sdb1 8:17 0 10G 0 part Format the disk and create an XFS file system to it. sudo parted --script /dev/sdb "mklabel gpt" sudo parted --script /dev/sdb "mkpart primary 0% 100%" sudo mkfs.xfs /dev/sdb1 Mount the disk to your desired path. sudo mkdir /mnt/datastore sudo mount /dev/sdb1 /mnt/datastore Verify if the disk has been mounted. $ sudo mount | grep /dev/sdb1 /dev/sdb1 on /mnt/datastore type xfs (rw,relatime,seclabel,attr2,inode64,logbufs=8,logbsize=32k,noquota) Create the persistent volumes in the disk. sudo mkdir /mnt/datastore/setup sudo mkdir /mnt/datastore/elasticsearch Set the right permissions. sudo chmod 775 -R /mnt/datastore sudo chown -R $USER:docker /mnt/datastore On Rhel-based systems, configure SELinux as below. sudo setenforce 0 sudo sed -i 's/^SELINUX=.*/SELINUX=permissive/g' /etc/selinux/config Create the external volumes: For Elasticsearch docker volume create --driver local \ --opt type=none \ --opt device=/mnt/datastore/elasticsearch \ --opt o=bind elasticsearch For setup docker volume create --driver local \ --opt type=none \ --opt device=/mnt/datastore/setup \ --opt o=bind setup Verify if the volumes have been created. $ docker volume list DRIVER VOLUME NAME local elasticsearch local setup View more details about the volume. $ docker volume inspect setup [ "CreatedAt": "2022-05-06T13:19:33Z", "Driver": "local", "Labels": , "Mountpoint": "/var/lib/docker/volumes/setup/_data", "Name": "setup", "Options": "device": "/mnt/datastore/setup", "o": "bind", "type": "none" , "Scope": "local" ] Go back to the YAML file and add these lines at the end of the file.
$ vim docker-compose.yml ....... volumes: setup: external: true elasticsearch: external: true Now you should have the YAML file with changes made in the below areas: Step 4 – Bringing up the Elastic stack After the desired changes have been made, bring up the Elastic stack with the command: docker-compose up -d Execution output: [+] Building 6.4s (12/17) => [docker-elk_setup internal] load build definition from Dockerfile 0.3s => => transferring dockerfile: 389B 0.0s => [docker-elk_setup internal] load .dockerignore 0.5s => => transferring context: 250B 0.0s => [docker-elk_logstash internal] load build definition from Dockerfile 0.6s => => transferring dockerfile: 312B 0.0s => [docker-elk_elasticsearch internal] load build definition from Dockerfile 0.6s => => transferring dockerfile: 324B 0.0s => [docker-elk_logstash internal] load .dockerignore 0.7s => => transferring context: 188B ........ Once complete, check if the containers are running: $ docker ps CONTAINER ID IMAGE COMMAND CREATED STATUS PORTS NAMES 096ddc76c6b9 docker-elk_logstash "/usr/local/bin/dock…" 9 seconds ago Up 5 seconds 0.0.0.0:5000->5000/tcp, :::5000->5000/tcp, 0.0.0.0:5044->5044/tcp, :::5044->5044/tcp, 0.0.0.0:9600->9600/tcp, 0.0.0.0:5000->5000/udp, :::9600->9600/tcp, :::5000->5000/udp docker-elk-logstash-1 ec3aab33a213 docker-elk_kibana "/bin/tini -- /usr/l…" 9 seconds ago Up 5 seconds 0.0.0.0:5601->5601/tcp, :::5601->5601/tcp docker-elk-kibana-1 b365f809d9f8 docker-elk_setup "/entrypoint.sh" 10 seconds ago Up 7 seconds 9200/tcp, 9300/tcp docker-elk-setup-1 45f6ba48a89f docker-elk_elasticsearch "/bin/tini -- /usr/l…" 10 seconds ago Up 7 seconds 0.0.0.0:9200->9200/tcp, :::9200->9200/tcp, 0.0.0.0:9300->9300/tcp, :::9300->9300/tcp docker-elk-elasticsearch-1 Verify if Elastic search is running: $ curl http://localhost:9200 -u elastic:StrongPassw0rd1 "name" : "45f6ba48a89f", "cluster_name" : "my-cluster", "cluster_uuid" : "hGyChEAVQD682yVAx--iEQ", "version" : "number" : "8.1.3", "build_flavor" : "default", "build_type" : "docker", "build_hash" : "39afaa3c0fe7db4869a161985e240bd7182d7a07", "build_date" : "2022-04-19T08:13:25.444693396Z", "build_snapshot" : false, "lucene_version" : "9.0.0", "minimum_wire_compatibility_version" : "7.17.0", "minimum_index_compatibility_version" : "7.0.0" , "tagline" : "You Know, for Search"
Step 5 – Access the Kibana Dashboard. At this point, you can proceed and access the Kibana dashboard running on port 5601. But first, allow the required ports through the firewall. ##For Firewalld sudo firewall-cmd --add-port=5601/tcp --permanent sudo firewall-cmd --add-port=5044/tcp --permanent sudo firewall-cmd --reload ##For UFW sudo ufw allow 5601/tcp sudo ufw allow 5044/tcp Now proceed and access the Kibana dashboard with the URL http://IP_Address:5601 or http://Domain_name:5601. Login using the credentials set for the Elasticsearch user: Username: elastic Password: StrongPassw0rd1 On successful authentication, you should see the dashboard. Now to prove that the ELK stack is running as desired. We will inject some data/log entries. Logstash here allows us to send content via TCP as below. # Using BSD netcat (Debian, Ubuntu, MacOS system, ...) cat /path/to/logfile.log | nc -q0 localhost 5000 For example: cat /var/log/syslog | nc -q0 localhost 5000 Once the logs have been loaded, proceed and view them under the Observability tab. That is it! You have your Elastic stack (ELK) running perfectly. Step 6 – Cleanup In case you completely want to remove the Elastic stack (ELK) and all the persistent data, use the command: $ docker-compose down -v [+] Running 5/4 ⠿ Container docker-elk-kibana-1 Removed 10.5s ⠿ Container docker-elk-setup-1 Removed 0.1s ⠿ Container docker-elk-logstash-1 Removed 9.9s ⠿ Container docker-elk-elasticsearch-1 Removed 3.0s ⠿ Network docker-elk_elk Removed 0.1s Closing Thoughts. We have successfully walked through how to run Elastic stack (ELK) on Docker Containers using Docker Compose. Futhermore, we have learned how to create an external persistent volume for Docker containers. I hope this was significant.
0 notes
Text
Davmail gateway thunderbird

#Davmail gateway thunderbird how to#
#Davmail gateway thunderbird install#
You can now use this to interface the mail client(s) of your choice with an Exchange server. Enjoy!Īnd with that, you have davmail running inside a container, with the appropriate port-mappings configured. Complexity avoided is hours of time we get to keep. You can start, stop, kill, abuse, disabuse, etc, the container davmail is running inside without fear of anything more than disrupting communications between your clients and the server. This container is stateless - that is, it only handles translating between standards-compliant and Exchange-compliant tools.
#Davmail gateway thunderbird install#
Now that we have an upstart config file, all that remains is to install the file appropriately (that is, copy it into /etc/init/ and start the service: That is, when you go looking for IMAP, you'll find it accessible at 127.0.0.1:11143 from the cloud instance only this prevents attackers from being able to connect to your davmail instance remotely. binds only to ports on the loopback interface.We additionally tell docker to bind ours such that our cloud instance: Remember nix systems disallow non-privileged process from binding to ports Docker port-forwards are also established from the "trial run" log above we can see that the ports davmail will listen on are: Not surprisingly, the heart is centered around the docker run command that we can see at the core of the upstart config.
#Davmail gateway thunderbird how to#
declares how to start (lines 15-27) and stop (lines 30-35) the service.declares that the service should be relaunched if it terminates unexpectedly (line 11) and establishes safe limits (line 12).declares dependencies on the docker.io service (lines 6 and 7).Note how our upstart config does a couple different things here: It is available by default on recent Ubuntu systems, and is very convienient to our purposes. Upstart is an approach to unix daemon management. Tada! :) Configure a container to run as a system service via upstart If so, you can use this image as a starting point, ADD the changed configuration to the image, and rebuild. You may need to edit the davmail configuration to reflect the specific needs of your Exchange environment. does not run davmail as root inside the container.does not require any bind-mounts or other external volumes to be attached.We're going to use the rsrchboy/davmail-savvis-docker image - for obvious reasons - as it gives us a configured davmail container that: There are a couple davmail images available on the Docker Hub. It's worth mentioning that adding your userid to this group will allow you to interface with the docker service without needing to "sudo" it all the time this is left as an exercise for the reader. On line 33 we see a docker group being created. Our previous tutorial on containing Chef with Vagrant may provide some guidelines, but, as always, this is left as an exercise for the reader. You can fire up basic Ubuntu machine fairly easily. Prerequisitesįor the purposes of this article, we're going to assume that you're an enligtened sort, and are running a Ubuntu 14.04-based cloud instance (or workstation, or.). Even if your mail is boring beyond belief, please, do not access it unencrypted. Common - and well-established - solutions include the use of ssh port forwarding or (for a less ad-hoc approach) stunnel. Security is of utmost concern, particularly in a corporate environment, so please note that securing the connections between your local workstation and the cloud instance. One may find a more satisfying approach in using tools like puppet-git-receiver and Gareth Rushgrove's most excellent docker Puppet Forge module to manage the use of the upstream Docker packages as well as our container's upstart configuration - both of which will be covered in a future tutorial. For simplicity, we're using the docker.io package from Ubuntu and configuring by hand. Provisioning a CenturyLink Cloud instance is left as an exercise for the reader. Install Docker on a CenturyLink Cloud instance, provision a stateless container image running a davmail instance, and have the system manage the container via upstart. It's also standalone, can be used statelessly, and - with apologies - is Java, making it a fantastic candidate for running inside a Docker container. It's a great tool - and one of the only solutions. davmail is a Java application that knows how to translate between standards-compliant clients (like, say, Thunderbird) and an Exchange server that speaks only Exchange. This may pose a problem for you, if you prefer a non-Microsoft mail client: if the compatibility features are enabled, you'll be able to access your mail via IMAP and send over SMTP, as the Internet intended. Love it or hate it, sometimes we have to use an Exchange server to communicate.
0 notes
Text
Setup SSL for HLL crcon
Use NGINX Proxy Manager with Letsencrypt certificates for your HLL crcon
Prerequisites: Functioning crcon environment running on a Linux VPS with already accessible front-end using a noip.com free dynamic DNS domain
Step 1 Create a docker-compose.yml file with the following content:
version: '3' services: app: image: 'jc21/nginx-proxy-manager:latest' restart: unless-stopped ports: - '80:80' - '81:81' - '443:443' volumes: - ./data:/data - ./letsencrypt:/etc/letsencrypt Now run the following command sudo docker-compose up -d and wait while the image is being downloaded and the container has started. Step 2 Access the GUI like this http://your_server_IP:81 and login with [email protected] and password changeme . Click on the Hosts tab and then on Add proxy host. Enter your DynDNS domain name , e.g. mycrcon.ddns.net , under Scheme select https, under Forward Hostname/IP enter your server's IP address and under Forward port enter 9010 (default port, might be something else if you have changed this). Go to the SSL tab, click on None and select Request a new SSL certificate. Enter your e-mail address and enable the I agree to the Lets Encrypt Terms of Service button followed by clicking the Save button. After a short time a proxy host will have been added and you should be able to access the rcon GUI by using https://mycrcon.ddns.net . If you have a second or even third HLL server, you will a DynDNS domain per server and you just repeat step 2 using the correct port (9010, 9011 etc) for those crcon instances. Notes The NGINX proxy manager is accessible over http so login information is not encrypted. As a best practice I have to advise you to use a VPN connection to your VPS to access it's GUI.
Revision 1.0 September-2022
1 note
·
View note
Text
Dockers Strike in Britain!

Dockers in Britain are up for an eight-day strike today. This eight-day strike by the dockers is happening at the biggest container port in Britain Felixstowe. Britain’s water game runs strong for ages. Water is Britain’s biggest strength since ancient times. This strike by the workers includes 1,900 members. The members of Unite come together in the town of Suffolk. This is due to a dispute which led them to walk out. They invested in this strike over pay which is the first strike occurring at this port since 1989.This action has been considered the latest outbreak in the biggest industrial action. The action calls for a dig at several sectors of the economy. The dockers are conducting a vote in which the result is 9-1 in favor of the strike. This vote includes the crane drivers, machine operators, stevedores, and other workers. They are taking their action through a vote. This port handles an estimated four million containers a year from 20,000 ships. The strike by the workers will have a big impact on the port since the work will stop. Dockers Strike in Britain! General Secretary Sharon Graham said that Felixstowe dock is immensely profitable. The 2020 figures say that it has made £61 million in profits. The parent company related to this is very wealthy. CK Hutchison Holding Ltd. has given out £99 million to its shareholders. These profits reflect that the workers of Felixstowe can get a decent rise in pay. It is quite evident that both the companies have given importance to seeking multimillion-pound profits and dividends. The company failed to pay a decent wage to the dockers. Unite comes forward to support its workers at Felixstowe. Unite will give aid to the dockers until the dispute is resolved. They will work till decent pay is acclaimed. Unite is now focusing on the betterment of its members’ jobs, pay, and working condition. Read the full article
0 notes
Link
#Automation#backup#cloudstorage#collaboration#dataprivacy#database#Docker#filesharing#HTTPS#Install#Linux#networking#Nextcloud#Nextcloudsetup#open-source#reverseproxy#Security#self-hosted#Server#systemadministration
0 notes
Video
youtube
Run Postgres Database in Docker Container | Postgres Docker Container Tu...
Hi, a new #video on #springboot #microservices with #postgres #database is published on #codeonedigest #youtube channel. Complete guide for #spring boot microservices with #postgressql. Learn #programming #coding with #codeonedigest
#springboot #postgres #microservices #postgresdb #springboot #Springbootmicroserviceswithpostgres #stepbystepspringbootmicroserviceswithpostgressql #Springboottutorial #springboot #springbootproject #springboottutorialforbeginners #springbootannotations #springbootmicroservices #springbootfullcourse #springboottutorial #springbootprojectstepbystep #postgresjava #postgresinstallation #postgrestutorial #postgrestutorialforbeginners #Springbootmicroservicespostgresdatabase #springbootmicroservices #springbootmicroservicespostgressqlexample #springbootmicroservices #springbootmicroservices #springbootpostgressql #microservicespostgres #postgressqlmicroservicesexample #postgresandpgadmininstall #postgresandpgadmininstallwindows #postgresandpgadmininstallubuntu #postgresandpgadmininstallwindows11 #postgresandpgadmininstallmacos #postgresandpgadmininstallwindows10 #postgrespasswordreset #postgrestutorial #postgresdocker #postgresinstallationerror #postgres #postgresdatabase #rdbms #postgresdatabasesetup #postgresdatabaseconfiguration #database #relationaldatabase #postgresconfiguration #postgresconfigurationfile #postgresconfigurationparameters #postgresconfigfilelocation #postgresconfigurationinspringboot #postgresconfigfilewindows #postgresconfigfilemax #postgresconfigfileubuntu #postgresconfigurereplication #postgresconfigurationsettings #postgresconnectiontoserver #postgresconnectioninjava #postgresconnectioncommandline #postgresconnectioninnodejs
#youtube#postgres database#docker container#postgres docker image#run postgres in docker container#dbeaver database tool#dbeaver tool#postgres setup#postgres installation#postgres configuration#postgres config#port mapping#docker port expose#docker port forward
1 note
·
View note
Text
Easy Methods To Share Files From Host To Docker

Docker is a prominent containerization solution that gives software applications a filesystem with whatever they need to run. It is one of the fastest growing technologies, statistics demonstrate study growth rate of over $1,382.1 million by 2026, with growth rate at a CAGR of 17.2%. Because the run-time environment of Docker containers is consistent, the software will act the same irrespective of where it is deployed.
Docker container development is not as straightforward as traditional application development. It can go smoothly once you’ve decided on a procedure. It is, however, not complicated as people expect. It’s just a matter of understanding how simple Docker containers are to use.
Professional Docker consulting services can help you share data between a host and docker containers as a simple operation. A report states that over 50% of the companies use container technologies.
A developer may desire to write code outside the container. Perhaps more than one person is working on the project, but only one team member has access to the operating container.
The people would share their code in this circumstance, and the lead would then have to get the unique code into the container. Though there is a chance to cut and paste, it could be easier to use a single command to copy the new file.
Docker containers are temporary, lasting only as long as the command issued in the container completes. Any data created within the container is only accessible from the inside container while it is running by default.
However, there are situations when apps need to share or keep data after a container is removed. Databases, user-generated material for a website, and log files are a few samples of data that are difficult or impossible to incorporate in a Docker image but required by applications. Docker Volumes give you consistent access to your data.
Docker Volumes can be generated and attached as part of the same command that produces a container, or they can be produced separately and attached afterwards.
Prerequisite
Docker consulting services recommend you to have a functioning Docker instance and a user that belongs to the docker group to make this work.
Method 1 – Using Docker cp command
The Docker cp command copies directories and files from the host machine to the container and vice versa. You can use the command below to copy a single file from the host to the container.
docker cp <source path><container>:<destination path> docker cp <container>:<source path><destination path>
The command docker cp replicates the contents of the source path to the destination path. Files can be copied from a local host machine to a Docker container and vice versa.
Note that the docker cp command expects that docker container paths are equivalent to the docker container’s root directory ��/.” It means that the following commands are the same whether you use slash at the start of the route or not, and they will work.
Let’s have a detailed look to transfer files from the host to the Docker container
STEP 1 – Bind Mounting a Volume
Create a directory called nginx logs in the current user’s home directory and bind mount it to /var/log/nginx in the container with the following command:
docker run –name=nginx -d -v ~/nginxlogs:/var/log/nginx -p 5000:80 nginx
Copy
Let’s have a look at this command in more detail:
The container is given the name nginx so that we may refer to it more readily.
-d separates the process from the rest of the system and executes it in the background. Otherwise, we’d just be staring at an empty Nginx prompt, unable to utilize this terminal until Nginx was destroyed.
-v ~/nginxlogs:/var/log/nginx creates a bind mount volume that connects the Nginx container’s /var/log/nginx directory to the host machine’s /nginxlogs directory. Docker divides the host path from the container path using a, with the host path always coming first.
A port forward is set up with -p 5000:80. By default, the Nginx container listens on port 80. This flag links the container’s port 80 to the host system’s port 5000.
The container should be constructed from the Nginx source code, according to nginx.
Step 2: Obtaining Data from the Host
Our host computer’s port 5000 maps directly to that copy of Nginx’s port 80, and we now have a copy of Nginx operating within a Docker container on our system.
Use your server’s IP address or hostname and the port number to load the address in a web browser: http://your server ip:5000. You should check out:
More interestingly, we can see the access.log written by the container’s nginx in the /nginxlogs directory on the host, which shows our request:
cat /nginxlogs/access.log
If you make any changes to the folder, you can see them in real-time from within the Docker container.
Source: 9series
#Docker consulting services#Docker Consulting#Docker Services#Docker#Consulting#Solutions#9series#Docker Container#Container#Docker container development
1 note
·
View note
Text
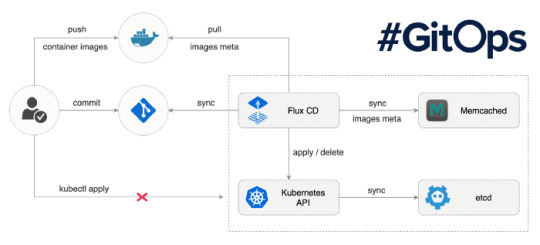
Overview of GitOps

What is GitOps? Guide to GitOps — Continuous Delivery for Cloud Native applications
GitOps is a way to do Kubernetes cluster management and application delivery. It works by using Git as a single source of truth for declarative infrastructure and applications, together with tools ensuring the actual state of infrastructure and applications converges towards the desired state declared in Git. With Git at the center of your delivery pipelines, developers can make pull requests to accelerate and simplify application deployments and operations tasks to your infrastructure or container-orchestration system (e.g. Kubernetes).
The core idea of GitOps is having a Git repository that always contains declarative descriptions of the infrastructure currently desired in the production environment and an automated process to make the production environment match the described state in the repository. If you want to deploy a new application or update an existing one, you only need to update the repository — the automated process handles everything else. It’s like having cruise control for managing your applications in production.
Modern software development practices assume support for reviewing changes, tracking history, comparing versions, and rolling back bad updates; GitOps applies the same tooling and engineering perspective to managing the systems that deliver direct business value to users and customers.

Pull-based Deployments

more info @ https://gitops.tech
The Pull-based deployment strategy uses the same concepts as the push-based variant but differs in how the deployment pipeline works. Traditional CI/CD pipelines are triggered by an external event, for example when new code is pushed to an application repository. With the pull-based deployment approach, the operator is introduced. It takes over the role of the pipeline by continuously comparing the desired state in the environment repository with the actual state in the deployed infrastructure. Whenever differences are noticed, the operator updates the infrastructure to match the environment repository. Additionally the image registry can be monitored to find new versions of images to deploy.
Just like the push-based deployment, this variant updates the environment whenever the environment repository changes. However, with the operator, changes can also be noticed in the other direction. Whenever the deployed infrastructure changes in any way not described in the environment repository, these changes are reverted. This ensures that all changes are made traceable in the Git log, by making all direct changes to the cluster impossible.
In Kubernetes eco-system we have overwhelming numbers of tools to achieve GitOps. let me share some of the tools as below,
Tools
ArgoCD: A GitOps operator for Kubernetes with a web interface
Flux: The GitOps Kubernetes operator by the creators of GitOps — Weaveworks
Gitkube: A tool for building and deploying docker images on Kubernetes using git push
JenkinsX: Continuous Delivery on Kubernetes with built-in GitOps
Terragrunt: A wrapper for Terraform for keeping configurations DRY, and managing remote state
WKSctl: A tool for Kubernetes cluster configuration management based on GitOps principles
Helm Operator: An operator for using GitOps on K8s with Helm
Also check out Weavework’s Awesome-GitOps.
Benefits of GitOps
Faster development
Better Ops
Stronger security guarantees
Easier compliance and auditing
Demo time — We will be using Flux
Prerequisites: You must have running Kubernetes cluster.
Install “Fluxctl”. I have used Ubuntu 18.04 for demo.
sudo snap install fluxctl
2. Create new namespace called “flux”
kubectl create ns flux
3. Setup flux with your environmental repo. We are using repo “flux-get-started”.
export GHUSER="YOURUSER" fluxctl install \ --git-user=${GHUSER} \ --git-email=${GHUSER}@users.noreply.github.com \ [email protected]:${GHUSER}/flux-get-started \ --git-path=namespaces,workloads \ --namespace=flux | kubectl apply -f -
4. Set Deploy key in Github. You will need your public key.
fluxctl identity --k8s-fwd-ns flux


5. At this point you must have following pods, Services running on your cluster. (In “flux” and “demo” namespace)

namespace: flux

namespace: demo
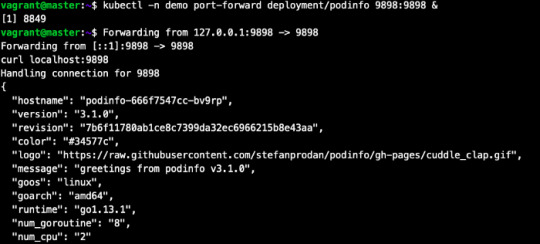
6. Let’s test what we have deployed.
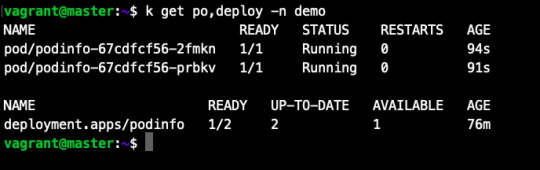
kubectl -n demo port-forward deployment/podinfo 9898:9898 & curl localhost:9898
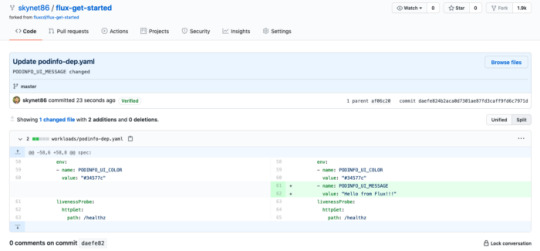
7. Now, lets make small change in repo and commit it to master branch.
By default, Flux git pull frequency is set to 5 minutes. You can tell Flux to sync the changes immediately with:
fluxctl sync --k8s-fwd-ns flux
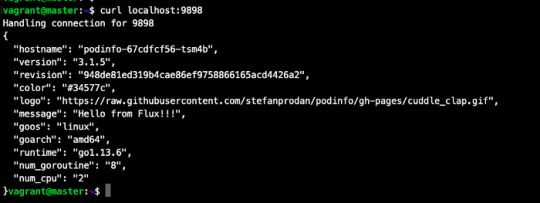
Wow our changes from our repo has been successfully applied on cluster.
our changes from our repo has been successfully applied on cluster.
Let’s do one more test, assume that by mistake someone has reduced/deleted your pods on production cluster.

By default, Flux git pull frequency is set to 5 minutes. You can tell Flux to sync the changes immediately with:
fluxctl sync --k8s-fwd-ns flux
You have successfully restored your cluster in GitOps way. No Kubectl required!!
Whenever the deployed infrastructure changes in any way not described in the environment repository, these changes are reverted.
Thank You for reading.
Source:
#cloud native application#cloud app development#software development#mobile app development#kubernetes cluster#WeCode Inc#Japan
0 notes
Text
Xdebug Chrome

Xdebug is an extension for debugging your PHP. The following explains how to configure Xdebug and PhpStorm to debug in your local environment. You can use the IDE of your choice. See the vendor documentation for those applications for further configuration information.
Xdebug Helper
Xdebug Chrome Extension
Chrome Xdebug Not Working
Xdebug Chrome How To Use
You will surely like this chrome extension if you love debugging, profiling and tracing PHP code with Xdebug. It comes handy for PHP developers that loves using PHP tools with Xdebug support like PHPStorm, Eclipse with PDT, Netbeans and MacGDBp or any other Xdebug compatible profiling tool like KCacheGrind, WinCacheGrind or Webgrind. Enabling XDEBUG in Web Browsers Chrome. There are two really useful plugins for Chrome that you should install: XDEBUG Helper- This will enable you to turn XDEBUG on and off from your web browser without having to modify the URL. This is essential when debugging a POST type form submission where you can't just enter a URL.
You can configure Xdebug to run in the Magento Cloud Docker environment for local debugging without changing your Magento Commerce Cloud project configuration. See Configure Xdebug for Docker.
To set up Xdebug, you need to configure a file in your Git repository, configure your IDE, and set up port forwarding. You can configure settings in the magento.app.yaml file. After editing, you can push the Git changes across all Starter environments and Pro Integration environments to enable Xdebug. To push these settings to Pro plan Staging and Production environments, you must enter a ticket.
Once configured, you can debug CLI commands, web requests, and code. Remember, all Magento Commerce Cloud environments are read-only. You need to pull code to your local development environment to perform debugging. For Pro Staging and Production environments, we include additional instructions for Xdebug.
Requirements
To run and use Xdebug, you need the SSH URL for the environment. You can locate the information through the Project Web Interface or your Cloud Onboarding UI.
Configure Xdebug
To configure Xdebug, you need to do the following:
Work in a branch to push file updates
Configure your IDE, like PhpStorm
For configuring on Pro plan Staging and Production, you need to enter a ticket for Staging and Production.
Get started with a branch
To add Xdebug, we recommend creating a branch to work in and add the files.

To get started with environment branches:
On your local workstation, change to your Cloud project directory.
Switch to the Magento file system owner.
Log in to your Magento project.
List your projects.
List environments in the project. Every environment includes an active Git branch that contains your code, database, environment variables, configurations, and services.
It is important to use the magento-cloud environment:list command because it displays environment hierarchies, whereas the git branch command does not.
Fetch origin branches to get the latest code.
Checkout, or switch to, a specific branch and environment.
Git commands only checkout the Git branch. The magento-cloud checkout command checks out the branch and switches to the active environment.
You can create a new environment branch using the magento-cloud environment:branch <environment-name> <parent-environment-ID> command syntax. It may take some additional time to create and activate a new environment branch.
Use the environment ID to pull any updated code to your local. This is not necessary if the environment branch is new.
(Optional) Create a snapshot of the environment as a backup.
Enable Xdebug in your environment
To enable Xdebug for your project, add xdebug to the runtime:extensions section of the .magento.app.yaml file.
You can enable Xdebug directly to all Starter environments and Pro Integration environments. For Pro Staging and Production, you need to update this file and enter a Support ticket to have it enabled. We enable Xdebug on those environments for you.
To enable Xdebug:
In your local terminal, open the .magento.app.yaml file in a text editor.
In the runtime section, under extensions, add xdebug. For example:
Save your changes to the .magento.app.yaml file and exit the text editor.
Add, commit, and push the changes to redeploy the environment.
When deployed to Starter environments and Pro Integration environments, Xdebug is now available. You should continue configuring your IDE. For PhpStorm, see Configure PhpStorm.
Configure PhpStorm
You need to configure PhpStorm to properly work with Xdebug.
To configure PhpStorm to work with Xdebug:
In your PhpStorm project, open the settings panel.
Mac OS X—Select PhpStorm > Preferences.
Windows/Linux—Select File > Settings.
In the Settings panel, expand and locate the Languages & Frameworks > PHP > Servers section.
Click the + to add a server configuration. The project name is in grey at the top.
Configure the following settings for the new server configuration:
Name—enter the same as the hostname. This value is used in and must match the value for PHP_IDE_CONFIG variable in Debug CLI commands.
Host—Enter localhost.
Port—Enter 80.
Debugger—Select Xdebug.
Select Use path mappings. In the File/Directory pane, the root of the project for the serverName displays.
In the Absolute path on the server column, click (Edit) and add a setting based on the environment:
For all Starter environments and Pro Integration environments, the remote path is /app.
For Pro Staging and Production environments:
Production: /app/<project_code>/
Staging: /app/<project_code>_stg/
Change the Xdebug port to 9000 in the Languages & Frameworks > PHP > Debug > Xdebug > Debug Port panel.
Click Apply.
Set up port forwarding
You must map the XDEBUG connection from the server to your local system. To do any type of debugging, you must forward port 9000 from your Magento Commerce Cloud server to your local machine. See one of the following sections:
Port forwarding on Mac or UNIX
To set up port forwarding on a Mac or in a Unix environment:
Open a terminal.
Use SSH to establish the connection.
Add the -v option to the SSH command to show in the terminal whenever a socket is connected to the port that is being forwarded.
If an “unable to connect” or “could not listen to port on remote” error is displayed, there could be another active SSH session persisting on the server that is occupying port 9000. If that connection isn’t being used, you can terminate it.
To troubleshoot the connection:
Use SSH to log in to the remote Integration, Staging, or Production environment.
Enter who to view a list of SSH sessions.
View existing SSH sessions by user. Be careful to not affect a user other than yourself!
Integration: usernames are similar to dd2q5ct7mhgus
Staging: usernames are similar to dd2q5ct7mhgus_stg
Production: usernames are similar to dd2q5ct7mhgus
For a user session that is older than yours, find the pseudo-terminal (PTS) value, such as pts/0.
Kill the process ID (PID) corresponding to the PTS value.
Sample response:
To terminate the connection, enter a kill command with the process ID (PID).
Port forwarding on Windows
To set up port forwarding (SSH tunneling) on Windows, you must configure your Windows terminal application. For this example, we walk through creating an SSH tunnel using Putty. You can use other applications such as Cygwin. For more information on other applications, see the vendor documentation provided with those applications.
To set up an SSH tunnel on Windows using Putty:
If you have not already done so, download Putty.
Start Putty.
In the Category pane, click Session.
Enter the following information:
Hostname (or IP address) field: Enter the SSH URL for your Cloud server
Port field: Enter 22
In the Category pane, click Connection > SSH > Tunnels.
Enter the following information:
Source port field: Enter 9000
Destination field: Enter 127.0.0.1:9000
Click Remote
Click Add.
In the Category pane, click Session.
In the Saved Sessions field, enter a name for this SSH tunnel.
Click Save.
To test the SSH tunnel, click Load, then click Open.
If an “unable to connect” error displays, verify all of the following:
All Putty settings are correct
You are running Putty on the machine on which your private Magento Commerce Cloud SSH keys are located
Configure Pro Staging and Production
To complete configuration for Pro plan Staging and Production environments, you must enter a Support ticket to have Xdebug enabled and configured in Staging and Production environments.
We enable Xdebug in the environment. Be aware that this is a configuration change that requires us to redeploy your Staging and Production environments.
SSH access to Xdebug environments
For initiating debugging, performing setup, and more, you need the SSH commands for accessing the environments. You can get this information, through the Project Web Interface and your project spreadsheet.
Xdebug Helper
For Starter environments and Pro Integration environments, you can use the following Magento Cloud CLI command to SSH into those environments:
To use Xdebug, SSH to the environment as follows:
For example,
Debug for Pro Staging and Production
To use Xdebug specifically on Pro plan Staging and Production environment, you create a separate SSH tunnel and web session only you have access to. This usage differs from typical access, only providing access to you and not to all users.

You need the following:
SSH commands for accessing the environments. You can get this information, through the Project Web Interface or your Cloud Onboarding UI.
The xdebug_key value we set when configuring the Staging and Pro environments
To set up an SSH tunnel to a Staging or Production environment:
Open a terminal.
Clean up all SSH sessions.
Set up the SSH tunnel for Xdebug.
To start debugging using the environment URL:
To enable remote debugging, visit the site in the browser with the following added to the URL where KEY is value for xdebug_key:
This sets the cookie that sends browser requests to trigger Xdebug.
Complete your debugging with Xdebug.
When you are ready to end the session, you can use the following command to remove the cookie and end debugging through the browser where KEY is value for xdebug_key:
The XDEBUG_SESSION_START passed by POST requests are not supported at this time.
Debug CLI commands
This section walks through debugging CLI commands.
To debug CLI commands:
SSH into the server you want to debug using CLI commands.
Create the following environment variables:
These variables are removed when the SSH session ends.
Begin debugging
On Starter environments and Pro Integration environments, run the CLI command to debug.You may add runtime options, for example:
On Pro Staging and Production environments, you must specify the path to the Xdebug php configuration file when debugging CLI commands, for example:
For debugging web requests
The following steps help you debug web requests.
On the Extension menu, click Debug to enable.
Right click, select the options menu, and set the IDE key to PHPSTORM.
Install the Xdebug client on the browser. Configure and enable it.
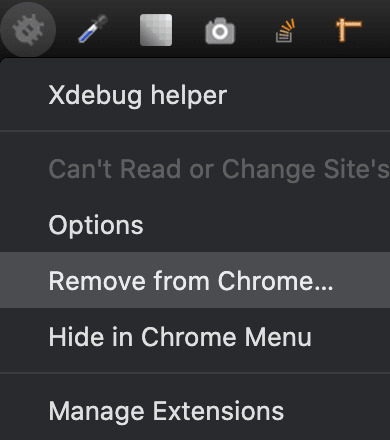
Example set up on Chrome
This section discusses how to use Xdebug in Chrome using the Xdebug Helper extension. For information about Xdebug tools for other browsers, consult the browser documentation.
To use Xdebug Helper with Chrome:
Create an SSH tunnel to the Cloud server.
Install the Xdebug Helper extension from the Chrome store.
Enable the extension in Chrome as shown in the following figure.
In Chrome, right-click in the Chrome toolbar.
From the pop-up menu, click Options.
From the IDE Key list, click PhpStorm.
Click Save.
Open your PhpStorm project.
In the top navigation bar, click (Start listening).
If the navigation bar isn’t displayed, click View > Navigation Bar.
In the PhpStorm navigation pane, double-click the PHP file to test.
Debug code locally
Due to the read-only environments, you need to pull code locally from an environment or specific Git branch to perform debugging.
The method you choose is up to you. You have the following options:
Check out code from Git and run composer install
This method works unless composer.json references packages in private repositories to which you do not have access. This method results in getting the entire Magento codebase.
Copy the vendor, app, pub, lib, and setup directories
This method results in your having all code you can possibly test. Depending on how many static assets you have, it could result in a long transfer with a large volume of files.
Copy the vendor directory only
Because most Magento and third-party code is in the vendor directory, this method is likely to result in good testing although you will not be testing the entire codebase.
To compress files and copy them to your local machine:
Use SSH to login to the remote environment.
Compress the files.
For example, to compress the vendor directory only, enter
On your local environment, use PhpStorm to compress the files.
After spending way more time that I should like to admit trying to get XDEBUG to work with Notepad++ using the DBGp plugin in anything but the simplest of projects, I decided to look for an alternative.
I compared features of 9 different IDE's for PHP development and reading tons of reviews. There are many great IDE's out there and everyone will have their favourite. My short list ended up including:
Eclipse (PDT) 3.5 -- Didn't bother trying it. While I'm sure it's a fine product, the website is ancient and not user friendly. Way too much work to try and find information. I'm not sure if it is even being developed anymore. PDT isn't even listed in their main list of downloads. Although I didn't try Eclipse (PDT), I did try Aptana which is built on Eclipse but I don't want to have to struggle to figure out the user interface… I want to code!
NetBeans 8 -- Way better user interface than Eclipse in my opinion. It did take me a little to figure out the XDEBUG integration but I got it to work exactly as I expected. My problem was part technology and part learning what I wanted to do in NetBeans which was to initiate the debugging session from within my web browser without having to modify the URL.
Although both of these are free, I would not have minded paying for an IDE for PHP development since I do a fair amount of this for a living. Some of the try before you buy contenders included PhpStorm 7.13 and PHPDesigner 8.1.2.
They all have similar sets of features. PHPDesigner is even a native Windows app which is why I might still consider it.
I decided to give NetBeans a try. There are tons of stories on the Net from developers switching from Eclipse to NetBeans but very few going in the other direction. It includes almost all of the features I regularly use and plugins to fill in the gap. What was it missing? Like many of the cross-platform IDE's, it's a Java application which means it is slower than it could be on Windows. I also wish it had Timed Backups feature like in Notepad++.
Assuming you've downloaded and installed NetBeans, here's how to get it to work with XDEBUG:
Step 1 -- Configure PHP to work with XDEBUG
Modify your php.ini file. Start by commenting out anything that refers to ZEND… by adding a semi-colon in front (to the left) of the line. Zend is not compatible with XDEBUG.
Next comment out everything under the (xdebug) section. Then add the following, making sure to modify the lines that refer to your XAMPP path (doesn't work with the Lite version).
For 64-bit WAMP, the lines would be:
As you can see, the actual filename and location for the php_xdebug.dll file may vary. Check the ext or zend_ext folder to get the correct name for your version of AMP. If your version of AMP did not come with XDEBUG, Follow the instructions found on the XDEBUG Installation Wizard page.
Save your changes and restart Apache.
Step 2- Configure NetBeans to work with XDEBUG
The following instructions are for NetBeans 8 but it should be fairly similar with other versions:
Open your project in NetBeans. If you don't have one yet, create one.
Click Tools > Options > PHP.
Click the Debugging tab and make sure that:
Debugger port: 9000.
Session ID: netbeans-xdebug
Maximum Data Length: 2048
None of the checkboxes are checked.
Click OK.
Click File > Project Properties > Run Configuration > Advanced button.
Select Do Not Open Web Browser and click OK twice.
Important: You will need to repeat these last two steps anytime you create a new project.
You may need to close and restart NetBeans for the changes to take effect as I discovered that they don't always take effect right away when you save.
That's it. It should now be configured and ready to use. Next we will XDEBUG enable your web browser.
Importing Existing Source Code into NetBeans
Creating a new NetBeans project from an existing source code folder/files is easy. The following instructions describe how to create a new NetBeans project using existing source code and without storing NetBeans' own project files in your original source code directory tree. Looks like a lot of steps but it only takes about a minute to complete.
Click File > New Project.
For the Category, select the PHP.
For the Projects, select PHP Application with Existing Sources.
Click Next.
Specify the path to the Source Folder. This is where you source code currently exists.
Specify a project name. This can be anything as long as it is different from other existing NetBeans projects you might have.
Specify the version of PHP you will be using. If you aren't sure, type the following at a Command prompt or verify your log files: php --version . If PHP isn't in your path, you may need to change to the directory where the PHP.exe application is located.
The default UTF-8 should be correct for most situations.
To prevent NetBeans from storing it's files in your source code directory, check the 'Put NetBeans metadata into a separate directory' box and specify the folder where these files should be stored.
Click Next.
For Run As:, select Local Web Site (running on local web server) if it is not already selected.
Project URL should be the path to the localhost that corresponds to source directory specified above. It typically looks like http://localhost/ and may include a folder name if your local website is not in the root of the server.
For PHP, the default index file is typically called index.php unless you've changed it.
DO NOT check the 'Copy files from Source Folder to another location' checkbox if you want to work on your files where they currently reside.
Click Finish.
NetBeans will then create the project and open the default file.
Enabling XDEBUG in Web Browsers
Chrome
There are two really useful plugins for Chrome that you should install:
XDEBUG Helper -- This will enable you to turn XDEBUG on and off from your web browser without having to modify the URL. This is essential when debugging a POST type form submission where you can't just enter a URL.
XDEBUG Output Toggler -- This extension allows you to toggle the visibility of the extremely useful stack trace messages for your PHP.
Firefox
There are also two really useful plugins for Firefox that you should install (to be tested):
easyXdebug or The easiest Xdebug -- This will enable you to turn XDEBUG on and off from your web browser without having to modify the URL. This is essential when debugging a POST type form submission where you can't just enter a URL. I don't recommend installing both of these add-ons as they might conflict with each other since they do the same function.
XDEBUG Error Togger -- This is the same as XDEBUG Output Togger for Chrome. It allows you to toggle the visibility of the extremely useful stack trace messages for your PHP.
Internet Explorer
Unfortunately I don't know of any integration tools that work with IE. If you know if any, leave a comment below. You'll always be able to debug by appending ?XDEBUG_SESSION_START=netbeans-xdebug to the URL
Using XDEBUG in NetBeans
Open your project.
Debugging a Project: Right-click on the project you want to debug. Then click on Debug to start the debugger. There is a Debug Project icon at the top of the editor that you could use however it will not work for debugging a specific file. Debugging a specific file in a project or standalone file: Right-click on the file either in the navigation pane or even in the source code itself and then click Debug. If the file is already open, right click anywhere in the editor window and select Debug.
Set a breakpoint by clicking on the line number in the margin. Otherwise your code will be executed from start to end and nothing will happen in debugger.
Switch to your web browser and load the page you want to debug.
Click the add-on/plugin icon to enable Xdebug in your browser.
Reload the page you want to debug and switch back to NetBeans. You should now notice that the execution of the code has paused where you set the breakpoint above.
You can now use the debugging controls in the toolbar to step over, step into, step out, run to cursor, run, and stop debugging.
Xdebug Chrome Extension
You may notice that your PHP code runs slower when debugging. This is perfectly normal and a good reason to have a fast computer. On the positive side, you'll really notice where the slower parts of your code are.
Troubleshooting
If you can't get it to work, check to make sure that your timezone is properly set in /xampp/php/php.ini. I'm not sure why but it made a difference for me. It will also make dates appear correctly on your website.
Chrome Xdebug Not Working
(Date) ; Defines the default timezone used by the date functions ; Find the value for your location by visiting http://php.net/date.timezone date.timezone = America/Toronto
Xdebug Chrome How To Use
Related Posts:
0 notes
Text
Fluent bit is an open source, light-weight log processing and forwarding service. Fluent bit allows to collect logs, events or metrics from different sources and process them. These data can then be delivered to different backends such as Elastic search, Splunk, Kafka, Data dog, InfluxDB or New Relic. Fluent bit is easy to setup and configure. It gives you full control of what data to collect, parsing the data to provide a structure to the data collected. It allows one to remove unwanted data, filter data and push to an output destination. Therefore, it provides an end to end solution for data collection. Some wonderful features of fluent bit are: High Performance It is super Lightweight and fast, requires less resource and memory It supports multiple data formats. The configuration file for Fluent Bit is very easy to understand and modify. Fluent Bit has built-in TLS/SSL support. Communication with the output destination is secured. Asynchronous I/O Fluent Bit is compatible with docker and kubernetes and can therefore be used to aggregate application logs. There are several ways to log in kubernetes. One way is the default stdout logs that are written to a host path”/var/log/containers” on the nodes in a cluster. This method requires a fluent bit DaemonSet to be deployed. A daemon sets deploys a fluent bit container on each node in the cluster. The second way of logging is the use of a persistent volume. This allows logs to be written and persistent in an internal or external storage such as Cephfs. Fluent bit can be setup as a deployment to read logs from a persistent Volume. In this Blog, we will look at how to send logs from a Kubernetes Persistent Volume to Elastic search using fluent bit. Once logs are sent to elastic search, we can use kibana to visualize and create dashboards using application logs and metrics. PREREQUISITES: First, we need to have a running Kubernetes Cluster. You can use our guides below to setup one if you do not have one yet: Install Kubernetes Cluster on Ubuntu with kubeadm Install Kubernetes Cluster on CentOS 7 with kubeadm Install Production Kubernetes Cluster with Rancher RKE Secondly, we will need an elastic search cluster setup. You can use elasticsearch installation guide if you don’t have one in place yet. In this tutorial, we will setup a sample elastic search environment using stateful sets deployed in the kubernetes environment. We will also need a kibana instance to help us visualize this logs. Deploy Elasticsearch Create the manifest file. This deployment assumes that we have a storage class cephfs in our cluster. A persistent volume will be created along side the elastic search stateful set. Modify this configuration as per your needs. $ vim elasticsearch-ss.yaml apiVersion: apps/v1 kind: StatefulSet metadata: name: es-cluster spec: serviceName: elasticsearch replicas: 1 selector: matchLabels: app: elasticsearch template: metadata: labels: app: elasticsearch spec: containers: - name: elasticsearch image: docker.elastic.co/elasticsearch/elasticsearch:7.2.0 resources: limits: cpu: 1000m requests: cpu: 100m ports: - containerPort: 9200 name: rest protocol: TCP - containerPort: 9300 name: inter-node protocol: TCP volumeMounts: - name: data mountPath: /usr/share/elasticsearch/data env: - name: cluster.name value: k8s-logs - name: node.name valueFrom: fieldRef: fieldPath: metadata.name - name: discovery.seed_hosts value: "es-cluster-0.elasticsearch" - name: cluster.initial_master_nodes value: "es-cluster-0" - name: ES_JAVA_OPTS value: "-Xms512m -Xmx512m"
initContainers: - name: fix-permissions image: busybox command: ["sh", "-c", "chown -R 1000:1000 /usr/share/elasticsearch/data"] securityContext: privileged: true volumeMounts: - name: data mountPath: /usr/share/elasticsearch/data - name: increase-vm-max-map image: busybox command: ["sysctl", "-w", "vm.max_map_count=262144"] securityContext: privileged: true - name: increase-fd-ulimit image: busybox command: ["sh", "-c", "ulimit -n 65536"] securityContext: privileged: true volumeClaimTemplates: - metadata: name: data labels: app: elasticsearch spec: accessModes: [ "ReadWriteOnce" ] storageClassName: cephfs resources: requests: storage: 5Gi Apply this configuration $ kubectl apply -f elasticsearch-ss.yaml 2. Create an elastic search service $ vim elasticsearch-svc.yaml kind: Service apiVersion: v1 metadata: name: elasticsearch labels: app: elasticsearch spec: selector: app: elasticsearch clusterIP: None ports: - port: 9200 name: rest - port: 9300 name: inter-node $ kubectl apply -f elasticsearch.svc 3. Deploy Kibana $ vim kibana.yaml --- apiVersion: apps/v1 kind: Deployment metadata: name: kibana labels: app: kibana spec: replicas: 1 selector: matchLabels: app: kibana template: metadata: labels: app: kibana spec: containers: - name: kibana image: docker.elastic.co/kibana/kibana:7.2.0 resources: limits: cpu: 1000m requests: cpu: 100m env: - name: ELASTICSEARCH_URL value: http://elasticsearch:9200 ports: - containerPort: 5601 --- apiVersion: v1 kind: Service metadata: name: kibana labels: app: kibana spec: ports: - port: 5601 selector: app: kibana Apply this configuration: $ kubectl apply -f kibana.yaml 4. We then need to configure and ingress route for the kibana service as follows: $ vim kibana-ingress.yaml apiVersion: extensions/v1beta1 kind: Ingress metadata: annotations: kubernetes.io/tls-acme: "true" ingress.kubernetes.io/force-ssl-redirect: "true" name: kibana spec: rules: - host: kibana.computingpost.com http: paths: - backend: serviceName: kibana servicePort: 5601 path: / tls: - hosts: - kibana.computingpost.com secretName: ingress-secret // This can be created prior if using custom certs $ kubectl apply -f kibana-ingress.yaml Kibana service should now be accessible via https://kibana.computingpost.com/ Once we have this setup, We can proceed to deploy fluent Bit. Step 1: Deploy Service Account, Role and Role Binding Create a deployment file with the following contents: $ vim fluent-bit-role.yaml --- apiVersion: v1 kind: ServiceAccount metadata: name: fluent-bit --- apiVersion: rbac.authorization.k8s.io/v1 kind: ClusterRole metadata: name: fluent-bit-read rules: - apiGroups: [""] resources: - namespaces - pods verbs: ["get", "list", "watch"] --- apiVersion: rbac.authorization.k8s.io/v1 kind: ClusterRoleBinding metadata: name: fluent-bit-read roleRef: apiGroup: rbac.authorization.k8s.io kind: ClusterRole name: fluent-bit-read subjects: - kind: ServiceAccount name: fluent-bit namespace: default Apply deployment config by running the command below. kubectl apply -f fluent-bit-role.yaml Step 2: Deploy a Fluent Bit configMap This config map allows us to be able to configure our fluent Bit service accordingly. Here, we define the log parsing and routing for Fluent Bit. Change this configuration to match your needs. $ vim fluentbit-configmap.yaml
apiVersion: v1 kind: ConfigMap metadata: labels: k8s-app: fluent-bit name: fluent-bit-config data: filter-kubernetes.conf: | [FILTER] Name kubernetes Match * Kube_URL https://kubernetes.default.svc:443 Kube_CA_File /var/run/secrets/kubernetes.io/serviceaccount/ca.crt Kube_Token_File /var/run/secrets/kubernetes.io/serviceaccount/token Kube_Tag_Prefix kube.var.log Merge_Log On Merge_Log_Key log_processed K8S-Logging.Parser On K8S-Logging.Exclude Off fluent-bit.conf: | [SERVICE] Flush 1 Log_Level info Daemon off Parsers_File parsers.conf HTTP_Server On HTTP_Listen 0.0.0.0 HTTP_Port 2020 @INCLUDE input-kubernetes.conf @INCLUDE filter-kubernetes.conf @INCLUDE output-elasticsearch.conf input-kubernetes.conf: | [INPUT] Name tail Tag * Path /var/log/*.log Parser json DB /var/log/flb_kube.db Mem_Buf_Limit 5MB Skip_Long_Lines On Refresh_Interval 10 output-elasticsearch.conf: | [OUTPUT] Name es Match * Host $FLUENT_ELASTICSEARCH_HOST Port $FLUENT_ELASTICSEARCH_PORT Logstash_Format On Replace_Dots On Retry_Limit False parsers.conf: | [PARSER] Name apache Format regex Regex ^(?[^ ]*) [^ ]* (?[^ ]*) \[(?[^\]]*)\] "(?\S+)(?: +(?[^\"]*?)(?: +\S*)?)?" (?[^ ]*) (?[^ ]*)(?: "(?[^\"]*)" "(?[^\"]*)")?$ Time_Key time Time_Format %d/%b/%Y:%H:%M:%S %z [PARSER] Name apache2 Format regex Regex ^(?[^ ]*) [^ ]* (?[^ ]*) \[(?[^\]]*)\] "(?\S+)(?: +(?[^ ]*) +\S*)?" (?[^ ]*) (?[^ ]*)(?: "(?[^\"]*)" "(?[^\"]*)")?$ Time_Key time Time_Format %d/%b/%Y:%H:%M:%S %z [PARSER] Name apache_error Format regex Regex ^\[[^ ]* (?[^\]]*)\] \[(?[^\]]*)\](?: \[pid (?[^\]]*)\])?( \[client (?[^\]]*)\])? (?.*)$ [PARSER] Name nginx Format regex Regex ^(?[^ ]*) (?[^ ]*) (?[^ ]*) \[(?[^\]]*)\] "(?\S+)(?: +(?[^\"]*?)(?: +\S*)?)?" (?[^ ]*) (?[^ ]*)(?: "(?[^\"]*)" "(?[^\"]*)")?$ Time_Key time Time_Format %d/%b/%Y:%H:%M:%S %z [PARSER] Name json Format json Time_Key time Time_Format %d/%b/%Y:%H:%M:%S %z [PARSER] Name docker Format json Time_Key time Time_Format %Y-%m-%d %H:%M:%S.%L Time_Keep On [PARSER] # http://rubular.com/r/tjUt3Awgg4 Name cri Format regex Regex ^(?[^ ]+) (?stdout|stderr) (?[^ ]*) (?.*)$ Time_Key time Time_Format %Y-%m-%dT%H:%M:%S.%L%z [PARSER] Name syslog Format regex Regex ^\(?[^ ]* 1,2[^ ]* [^ ]*) (?[^ ]*) (?[a-zA-Z0-9_\/\.\-]*)(?:\[(?[0-9]+)\])?(?:[^\:]*\:)? *(?.*)$ Time_Key time Time_Format %b %d %H:%M:%S kubectl apply -f fluentbit-configmap.yaml Step 3: Create a Persistent Volume Claim This is where we will write application logs. $ vim pvc.yaml apiVersion: v1 kind: PersistentVolumeClaim metadata: name: logs-pvc spec: accessModes: - ReadWriteMany storageClassName: cephfs #Change accordingly resources: requests: storage: 5Gi $ kubectl apply -f pvc.yaml Step 4: Deploy a kubernetes deployment using the config map in a file $ vim fluentbit-deployment.yaml apiVersion: apps/v1 kind: Deployment metadata: labels: k8s-app: fluent-bit-logging name: fluent-bit spec: replicas: 1 selector: matchLabels:
k8s-app: fluent-bit-logging template: metadata: annotations: prometheus.io/path: /api/v1/metrics/prometheus prometheus.io/port: "2020" prometheus.io/scrape: "true" labels: k8s-app: fluent-bit-logging kubernetes.io/cluster-service: "true" version: v1 spec: containers: - env: - name: FLUENT_ELASTICSEARCH_HOST value: elasticsearch - name: FLUENT_ELASTICSEARCH_PORT value: "9200" image: fluent/fluent-bit:1.5 imagePullPolicy: Always name: fluent-bit ports: - containerPort: 2020 protocol: TCP resources: terminationMessagePath: /dev/termination-log terminationMessagePolicy: File volumeMounts: - mountPath: /var/log name: varlog - mountPath: /fluent-bit/etc/ name: fluent-bit-config dnsPolicy: ClusterFirst restartPolicy: Always schedulerName: default-scheduler securityContext: serviceAccount: fluent-bit serviceAccountName: fluent-bit volumes: - name: varlog persistentVolumeClaim: claimName: logs-pvc - configMap: defaultMode: 420 name: fluent-bit-config name: fluent-bit-config Create objects by running the command below: $ kubectl apply -f fluentbit-deployment.yaml Step 5: Deploy an application Let’s test that our fluent bit service works as expected. We will use an test application that writes logs to our persistent volume. $ vim testpod.yaml apiVersion: v1 kind: Pod metadata: name: test-pod spec: containers: - name: app image: centos command: ["/bin/sh"] args: ["-c", "while true; do echo $(date -u) >> /var/log/app.log; sleep 5; done"] volumeMounts: - name: persistent-storage mountPath: /var/log volumes: - name: persistent-storage persistentVolumeClaim: claimName: logs-pvc Apply with the command: $ kubectl apply -f testpod.yaml Check if the pod is running. $ kubectl get pods You should see the following output: NAME READY STATUS RESTARTS AGE test-pod 1/1 Running 0 107s Once the pod is running, We can proceed to check if logs are sent to Elastic search. On Kibana, we will have to create an index as shown below. Click on “Management > Index Patterns> Create index pattern” Once the index has been created. Click on the discover icon to see if our logs are in place: See more guides on Kubernetes on our site.
0 notes
Text
What is Docker CE ? | learn how to install Dockers
What is docker
Docker is a computer program which is used to provide a running environment to run all kinds of application which are in docker hub, or created in docker. It creates an image of your application and stores all requirements of files into the container. Whenever we want to run docker application in any system, we have to run a single file without providing any other requirements.
Docker is easy to use in Ubuntu. It also supports Window and Mac operating system. For windows, it runs in Windows10/enterprise only. To use in Windows7/8/8.1 or Windows10 home should use docker toolbox.
There are two kind of docker software for programmers.
Docker CE :- Free community edition :- This is an open source software.
Docker EE :- Docker Enterprise Edition :- This is a paid software design for enterprise development and IT teams who build, ship, and run business-critical applications in production.
Requirements :-
Operating system (ubuntu)
Docker
Steps to install docker . Steps to download docker in ubuntu. 1. Open terminal and follow these command to install docker.
Just type docker and check if docker is in your system or not. $ docker
2. To check the version of operating system. To install Docker CE, we need the 64-bit version of one of these Ubuntu versions: 1. Cosmic 18.10 2. Bionic 18.04 (LTS) 3. Xenial 16.04 (LTS) $ lsb_release -a
3. Update the apt package index. $ sudo apt-get update
4. If requires, then install. $ sudo apt-get install
5. If docker is not in your system then install it. $ sudo apt-get install docker.io
6. Now check the staus of docker. $ sudo systemctl status docker
Steps to add user in docker 1. Why sudo :- We have to use 'sudo' command to run docker commands because docker container run user 'root'. We have to join the docker group, when your system join the docker group after that one can run docker command without sudo.
2. 'USER' is your system name, commands to add user as listed below. $user will pick system user 1. $ sudo groupadd docker 2. $ sudo gpasswd -a $USER 3. $ newgrp docker
3. Second way to add user in docker group. 1. $ sudo groupadd docker 2. $ sudo usermod -aG docker $USER
4. After adding a 'USER' into the docker group, we have to shut down or restart so that we can run docker commands without 'sudo'.
5. Command to uninstall docker. $ sudo apt-get remove docker docker-engine docker.io containerd runc
Docker commands 1.To check Docker version $ docker --version
2. To check Docker and containers info $ docker info
3. Find out which users are in the docker group and who is allowed to start docker containers. 1. $ getent group sudo
2. $ getent group docker
4. 'pull' command fetch the 'name_of_images' image from the 'Docker registry' and saves it to our system. $ docker pull busybox (busybox is name of image)
5. You can use the 'docker images' command to see a list of all images on your system. $ docker images
6. To find the location of the images in the system we need to follow some commands:- $ docker info path of docker:- "Docker Root Dir: /var/lib/docker"
Commands to check the images:-
$ cd /var/lib/docker
$ ls
pardise@pardise-MS-7817:/var/lib/docker$ cd image
bash: cd: image: Permission denied
Permission denied for all users
$ sudo su
$ root@pardise-MS-7817:/var/lib/docker# ls
Now docker info command will provide all details about images and containers
$root@pardise-MS-7817:/var/lib/docker/image/overlay2# docker info
7. Now run a Docker container based on this image. When you call run, the Docker client finds the image (busybox in this case), loads up the container and then runs a command in that container. $ docker run busybox
8. Now Docker client ran the 'echo' command in our busybox container and then exited it. $docker run busybox echo "hello from busybox"
9. Command to shows you all containers that are currently running. $ docker ps
10. List of all containers that one can run. Do notice that the STATUS column shows that these containers exited a few minutes ago. $ docker ps -a CONTAINER ID – Unique ID given to all the containers. IMAGE – Base image from which the container has been started. COMMAND – Command which was used when the container was started CREATED – Time at which the container was created. STATUS – The current status of the container (Up or Exited). PORTS – Port numbers if any, forwarded to the docker host for communicating with the external world. NAMES – It is a container name, you can specify your own name.
11. To start Container $ docker start (container id)
12. To login in Container $ docker attach (container id)
13. To stop container $ docker stop (container id)
Difference between images and containers
Docker Image is a set of files which has no state, whereas Docker Container is the abstract of Docker Image. In other words, Docker Container is the run time instance of images.
Remove images and containers 1. Docker containers are not automatically removed, firstly stop them, then can use docker rm command. Just copy the container IDs. $ docker rm 419600f601f9 (container_id)
2. Command to deletes all containers that have a status of exited. -q flag, only returns the numeric IDs and -f filters output based on conditions provided. $ docker rm $(docker ps -a -q -f status=exited)
3. Command to delete all container. $ docker container prune
4. Command to delete all images. To remove all images which are not referenced by any existing container, not just dangling ones, use the -a flag: $ docker images prune -a
dangling image is an image that is not tagged and is not used by any container. To remove dangling images type:-
$ docker images prune
$ docker rmi image_id image_id......
5. Removing all Unused Objects. It will remove all stopped containers,all dangling images,and all unused network. To remove all images which are not referenced by any existing container, use the -a flag: $ docker system prune -a
You can follow us and our codes at our github repository: https://github.com/amit-kumar001/You can follow us and our codes at our github
#What is docker#learn how to install Dockers#Steps to install docker#Difference between images and containers
0 notes